Getting Seram GIS data onto the eTrex 30
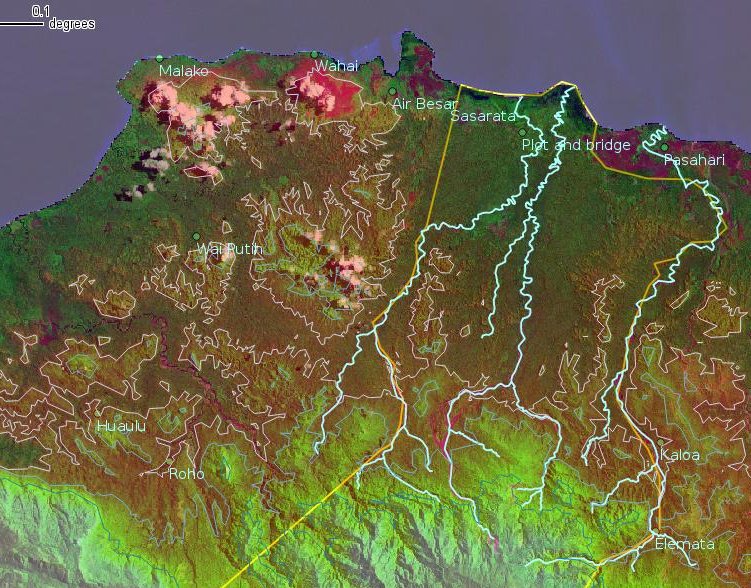
Having fun with GIS layers for Manusela national park, in QGIS
Another post about a GPS unit! We needed another GPS for the upcoming expedition to Seram, and I got a Garmin eTrex 30 in Jakarta from Alat Survey (with a free MicroSD with pre-loaded with a huge DB of Indonesia roads and services). The big plus is that the unit can read the Russian GLONASS satellites as well as the US GPS ones. However, the unit does not have the ‘Quad helix’ antenna of the 60CSx (great unit) and it remains to be seen if it is as sensitive under dense forest. This post is a note about my attempts to get data out of and into the unit.
Downloading
This is easy. Tracks appear in the Garmin/GPX/Current and
Garmin/GPX/Archive directories as GPX XML files, and can thus be
directly loaded into QGIS or GoogleEarth. In the system prefs, you can
also set the USB connection to ask of you want to go into Mass Storage
automatically or not. If you select non-Mass Storage, you can access
the device via the old Garmin serial protocol. To download points:
# gpsbabel -i garmin -f /dev/ttyUSB0 -o gpx -F mypoints.gpx
and tracks:
# gpsbabel -t -i garmin -f /dev/ttyUSB0 -o gpx -F mytracks.gpx
Uploading
The serial method for uploading waypoints and tracks:
# gpsbabel [-t] -i gpx -f test.gpx -o garmin -F /dev/ttyUSB0
does not work ([ERROR] Send_Waypoint), so we are limited to writing
files to the Mass Storage. Note: use just the external MicroSD for
new files. This way, if you change something vital, you can just pop
out the SD and restart. I learned this the hard way when I was
fiddling around with JNX files (below).
Rasters
Custom Maps
Currently the only way to upload rasters without hacking the firmware
is to use custom maps (jpegs as overlays). A good HOWTO is given on the
Garmin website. The
image is stored as a JPEG, zipped in a KMZ file (foo.kmz containing
doc.kml and files/<filename>.jpg) with doc.kml giving the
corners of the image:
  <?xml version="1.0" encoding="UTF-8"?>
  <kml xmlns="http://www.opengis.net/kml/2.2" ... >
    <GroundOverlay>
      <name>DEM</name>  <drawOrder>1</drawOrder>
      <Icon>
        <href>files/mydem.jpg</href>
        <viewBoundScale>0.75</viewBoundScale>
      </Icon>
      <LatLonBox>
        <north>0.0004172</north>  <south>-5.0004161</south>
        <east>130.0004168</east>  <west>124.9995835</west>
      </LatLonBox>
    </GroundOverlay>
    <GroundOverlay>
    ...
    </GroundOverlay>
  </kml>
so you don’t need GoogleEarth to make the KMZ file. If the image is in WGS84 long/lat and the corners are accurate, this image should be truly georeferenced on the GPS.
If you want to include window snapshots from GoogleEarth, the procedure is:
- Save the window as a JPEG image
- be sure that terrain visualization is off: it will warp the image; also that the viewpoint is directly vertical
- Note that the GPS decides which zoom levels to show the image at, probably depending on the total spatial size of the image. There does not seem to be a way to control this. The defaults seems to work generally OK.
- As for matching detail in the GE window with scale on the GPS,
I’ve found that for hi-res GE tiles (houses clearly visible) an
altitude of 4 km produces an image than look good on the GPS at
zoom level:
scale-bar=200m, and for lo-res GE tiles (Landsat) and altitude of 18 km produces an image than look good on the GPS at zoom level:scale-bar=800m
- Do not move the window
- Menu -> Add -> Image overlay, and select the saved file
- Pull the corners of the overlay image exactly to the corners of the window (use a bit of transparency to confirm)
- Set the draw order is using with other overlays
- Save as a KMZ file and copy to
Garmin/CustomMaps. There is no way to select which overlays are drawn on the GPS, so make sure the Draw Order assembles your images in the right order. Note that as you zoom in, the larger overlays will disappear automatically (see above).
Apart from window snapshots from GoogleEarth, I wanted to install
MrSid landsat images and DEMs from
STRM (and I just discovered
EarthExplorer). For MrSid, you can
extract the .sid files to GeoTifs with:
  mrsidgeodecode_linux -i S-52-00.sid -o seram.tif -of tifg -s 1 \
    -ulxy 3500 5300 -lrxy 11000 7700
These MrSIDs/GeoTifs are UTM (for Seram, UTM 52N) and load straight
into QGIS with project CRS of WGS84 long/lat and ‘on the fly’
reprojection. Interestingly, I found that the built-in UTM 52N CRS
(+proj=utm +zone=52 +ellps=bessel +towgs84=-148,507,685,0,0,0,0
+units=m +no_defs) was slightly off (ca 400 m dispacement to the
South) but after fiddling a while, I found that creating a custom CRS
of +proj=utm +zone=52 +ellps=bessel +towgs84=0,0,0,0,0,0,0 +units=m
+no_defs the MrSID image lined up exactly. You can reproject using
GDAL and convert to JPEG to create an appropriate KMZ for the GPS:
  $ gdalwarp -s_srs "+proj=utm +zone=52 +ellps=bessel
      +towgs84=0,0,0,0,0,0,0 +units=m +no_defs" -t_srs EPSG:4326
      -of GTiff seram.tif seram_dd.tif
  $ gdalinfo seram_dd.tif
  $ convert seram_dd.tif seram_dd.jpg
  $ emacs doc.kml
  $ mkdir files
  $ mv seram_dd.jpg files
  $ zip seram.kmz doc.kml files/seram_dd.jpg
I learned a lot with the GDAL Tools plugin to QGIS. E.g., you can make a
pretty DEM using gdaldem (play with the color ramp):
  $ cat terrain.txt
  0 0 0 0
  100 255 0 0
  500 255 255 0
  1000 255 255 255
  nv white
  $ gdaldem color-relief dem_in.tif terrain.txt dem_out.tif -of GTiff
JNX
I did look into the possibility of using the JNX format to add rasters
to the GPS (JNX is just a special version of GeoTif), but without
hacking the firmware, you only can add one demo .jnx file with a
spatial area of less that one square km. See the reverse engineering
work of A Whiter for more
details. Sucks that Garmin would lock up their device to prevent this
valuable functionality.
I did make a few files (map2jnx seram_dd.tif seram.jnx) and load to
Garmin/BirdsEye/, but they were declared not valid on booting the
GPS. I examined the Demo.JNX file and saw a different header
sequence than that described above, so I edited the header with
hexedit, reloaded the file and... bricked the GPS! Uggh. Even a hard
reset (On, while holding down Menu & Joystick-Enter) did not work. But
fortunately found
this post (thanks!) and could force Mass Storage mode and remove the offending
file. Phew!
Vector
Via GPX
The easiest way to get vector lines onto the GPS is by pretending they
are tracks. Any GPX track file stored in Garmin/GPX will be
available in the Track Manager and available for drawing on a map.
Any number of track segments in a single track will be drawn
together. E.g.:
  <?xml version="1.0"?>
  <gpx version="1.1" ...>
    <trk>
      <name>Layer one</name>
      <trkseg>
        <trkpt lat="-2.78041" lon="129.52435"/>
        <trkpt lat="-2.77958" lon="129.52375"/>
        ...
      </trkseg>
      <trkseg>
        <trkpt lat="-2.77958" lon="129.53808"/>
        ...
      </trkseg>
    </trk>
  </gpx>
For example, I traced the northern Manusela park rivers on GoogleEarth and saved the various lines in a folder for each river, and all these folders in ‘Rivers’ folder. Export to KML and:
gpsbabel -i kml -f rivers.kml -o gpx -F rivers.gpx
Then edit the GPX file. A few global replaces will force the format into the above.
For contours from the SRTM DEM:
gdal_contour -a ELEV -i 100 dem_in.tif contours/contours.shp
Load the shape files and select the contours you want (e.g., 100, 200,
500 only). You can then use ‘Simplify geometry’ in the QGIS fTools
plugin to simplify the lines (I used 0.001 degrees as the
tolerance). Select each contour level and ‘Save selection’ to a
GPX. Then concatenate the files and edit so that each contour becomes
a different track with a different <name>. Note that QGIS outputs GPX
‘routes’ not ‘tracks,’ but it’s easy to change this in an editor
(e.g., replace rtept -> trkpt and then rte -> trkseg). Note
that any number of tracks can be read from a single GPX file, but they
must have a <name> element to separate them in the Track Manager.
Finally, simply color code the different contours to your taste.
Via IMG
There are various tools (e.g.,
mkgmap) to collect and compress
vector layers into a gmapsupp.img file that can be accesses via the
Map Layers selection on the GPS. This is probably a better solution in
the long run than using tracks, but I haven’t had time to check it out
yet. See the comprehensive advice and tools on the Open Street Map
wiki (and
here).